
11.10.2010
Set up shop!
After much hemming and hawing, I went ahead and set up an etsy shop for my crocheted wares! There's only one style of hat listed right now, but there are several more to come! Check it out!
11.08.2010
Crotchety Crocheting
For some reason, I've been in kind of a funk for the past few weeks. Don't know what it is! At first, I was convinced I was pregnant, but two boxes of HPTs tell me otherwise. (Let's be honest, it'll take more than that to change my mind!) Anywho, I decided to start crocheting again as it's one of the things that helps me release tension and stress. I'm so glad I did because I've been able to complete a few projects and being able to admire my work always makes me feel better.
What was my favorite project, you ask? Well, the adorable winter hat I made for the Bot!


 It was so easy and I got to learn two new stitches!! I got the pattern off of Ravelry (my new favorite internet pattern source). And just tweaked it a bit to suit my tastes. It's a Japanese pattern so I had to find this other awesome website after I realized that Japanese peeps use diagrams for their patterns instead of writing it out.
I've been toying around with the idea of opening an Etsy shop for quite some time now, but I don't want to have to pay to list things that might not get sold, haha. Instead, I've decided to sell my wares over at The Bean & The Bot (named after my boys-my muses!). It's still in it's very beginning stages, but if you want a piece of this, you can certainly find out how to get some there!
What was my favorite project, you ask? Well, the adorable winter hat I made for the Bot!


I've been toying around with the idea of opening an Etsy shop for quite some time now, but I don't want to have to pay to list things that might not get sold, haha. Instead, I've decided to sell my wares over at The Bean & The Bot (named after my boys-my muses!). It's still in it's very beginning stages, but if you want a piece of this, you can certainly find out how to get some there!
10.17.2010
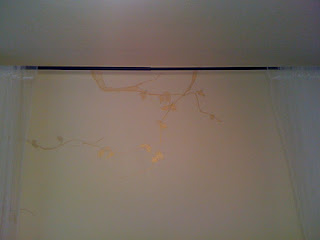
RED DOOR!
I've been wanting to paint my boring white door since we moved in over a year ago and finally I went on a DYI rampage the other week and got it done! While I was at it, I started a mural in my master bedroom (since I can't afford the wall stencils/vinyl design I wanted). Check it out!


 I also built that canopy for our anniversary. Now I just need to get awesome bedding and better furniture. *Sigh* someday!


8.04.2010
Heirloom in the making!
Have you ever used felt to make stuff? It had never crossed my mind and honestly I can't imagine why not because it's so well suited to the way I like to make things! (i.e. quickly and easily. Ooh! and cheap!)
Well, thanks to the internet and all you other crafty pants out there, I have now added felt crafts to my repotoire!
The Bot has been having a hard time sitting still during sacrament meeting at church these days and I've had it in my mind to make him a "quiet book" for some time now. I had one when I was a wee lass and I loved it! The one I had was all sewed and embroidered and I haven't quite mastered the whole sewing thing yet. Also, it takes too long and is too expensive (at least if I did what I had in mind it would have been).

I died and went to Hobby Lobby the other day and while I was there, I picked up a few different colors so I could try it out. While the boys took their nap this afternoon, I sat down at my craft station (a.k.a kitchen table) and gave it a go!


Well, thanks to the internet and all you other crafty pants out there, I have now added felt crafts to my repotoire!
The Bot has been having a hard time sitting still during sacrament meeting at church these days and I've had it in my mind to make him a "quiet book" for some time now. I had one when I was a wee lass and I loved it! The one I had was all sewed and embroidered and I haven't quite mastered the whole sewing thing yet. Also, it takes too long and is too expensive (at least if I did what I had in mind it would have been).
Enter felt!

First, I had to figure out what exactly I wanted this quiet book to look like. I think an ABC theme would be fun :)

You may notice a few "interesting" things on my idea sheet. Keep in mind that it's a work in progress and I'm a very "interesting" person. :) I should run my ideas by you to see what you think. Getting a feel for the general public should come in handy as I'm sure there will be several people in my ward who will at some point catch a glimpse of the book and I need to know if people are going to think I'm on crack.
So here's a run down of what's going in the book as of right now. I tried to use things that Rowan sees all the time or really likes:
A- detachable apple on a branch
B- basketball with hoop and net
C- cow with grass to eat
D- dinosaur and volcano (but I had a better idea that I forgot)
E- indian elephant with palm trees
F- freeze pop (in a freezer that opens)
G- goldfish (in a bowl)
H- house (our house-with little felt versions of us!)
I- ice cream (with detachable scoops of ice cream)
J- Jack-o-lantern (pumpkin pocket with different face shapes inside)
K- kangaroo w/ joey filled tummy pouch
L- lightbulb (any fun ideas for this one? Rowan looooves lights)
M- mullet :)
N- noodles
O- orangutan (I saw some fur at Hobby Lobby and I put it back because I didn't think I'd need it. Didn't think I'd need it?! Who do I think I am!?)
P- prison, haha. with a little removable guy in stripes behind bars and a ball and chain
Q- quail (with real feathers--but like...not that I plucked from a real quail or anything)
R- rocket (with that sparkly string stuff to simulate fire from the rocket bum)
S- sunrise (he'll be able to pull the sun up from behind a desert horizon with little cacti)
T- toilet w/plunger and liftable lid (if you've seen all of my videos on my other blog, you'll know why this makes sense. I have no explanation for "P is for prison" other than that a tiny felt felon in a tiny felt cell looks really cute in my head)
U- umbrella (plastic umbrella with sequins for rain)
V- vacuum (again, if you know my son, you'll get this)
W- wheels (movable wheels on an old-school bicycle)
X- x-ray (the hubs is an x-ray tech) i'll have a felt guy and a little x-ray paper that'll go over his abdomen or something
Y- yodeler (because I felt like it
Z- zipper (there will be a zipper in the middle of the page and a big letter 'z' will be inside it
Here's what I have so far. I'm going to have to go get a bunch more stuff now that I've decided what I'm going to do.


I still need to do some sewing and gluing and stitching on these things (you may have noticed the cow is missing the rest of his face). I'm so excited to finish it!! I keep telling myself that it's worth whatever time and money I invest in it because once it's finished it'll be a family heirloom that we can pass to each kiddo. Although, I might have to make a girly one if Buck ever produces a female heir!
8.03.2010
Sillhouette Giveaway at V & Co.!!
Ok, I know I'm probably not going to win (and one of you will because of this post, lol) but I thought you should know that there's a giveaway goin' on over at V & Co. and you should pretty much go check it out! Chances are you'll want to enter into the giveaway for yourself after you get a look at what's up for grabs. (Sillhouette craft machine, say what!?!)

Also, if after having seen this DIYer's dream machine, you don't win it and thus feel compelled to purchase one, I will understand completely any desire you might have to send it over to me as I'm sure you've thought to yourself in the past while perusing my blog- "Hmm...her projects would be a million times more awesome if she had some sort of mechanical assistance..."
Good luck to all! (But to me especially.)
;)
7.14.2010
FLDSMDFR Pinata
My son's second birthday was on the 12th and we'll be throwing his party this weekend! His favorite movie right now is Cloudy With A Chance Of Meatballs (coincidentally, it's also MY favorite movie right now) so that'll be the theme! I had so much fun coming up with different decoration, game, and food ideas. Sadly, due to our budget, certain ideas will not come to fruition :( (i.e. homemade nacho cheese fountain, mokey thought translators for the babies to wear, etc.)
I was, however, able to make Flint Lockwood's Diatonic Super Mutating Dynamic Food Replicator into a pinata for the event! I looked everywhere for those little gummy krabby patties so that when it gets busted open little hamburgers would come out. But, I couldn't find them anywhere!
Anyway, the cunstruction went surprisingly quickly. I drew up some plans:

.jpg)
.jpg)


.jpg)
.jpg)

I was, however, able to make Flint Lockwood's Diatonic Super Mutating Dynamic Food Replicator into a pinata for the event! I looked everywhere for those little gummy krabby patties so that when it gets busted open little hamburgers would come out. But, I couldn't find them anywhere!
Anyway, the cunstruction went surprisingly quickly. I drew up some plans:

Cut out my various pieces:
.jpg)
Taped them together with packing tape:
.jpg)

Cut some tissue paper into strips and glued them on:

.jpg)
Then, I put on all of the embellishments!
.jpg)

Tada!
I also made a banner with his name on it and today I'm making a "Pin the Chicken on Brent" game. Instead of a regular style cake, I'm going to make little cheeseburger shaped cakes for everyone. That should be a blogworthy occasion as I've never attempted any fancy cake shaping before.... Stay tuned!
7.06.2010
Sew Easy!
I recently took up sewing. There are so many things I want to make that would only be possible once that skill were accquired! So far, I've only completed two (literally) small projects and they were really just for practice. My first project ended up being a lot more difficult than I had anticipated but, this second project was just as easy as it looked in my head!
A friend of mine just had a baby girl at the beginning of last month so I made her (the baby) a dress!


A friend of mine just had a baby girl at the beginning of last month so I made her (the baby) a dress!

I found the fabric at Wal*Mart a little while ago for $1.00 a yard!! The fabric was way too busy to use for any big projects, but it was PERFECT for this!
All I did was:
-cut a big rectangle
-hemmed the two longer edges
-sewed a thin elastic strip across the top to create a shirring effect (you could do 3 or 4 rows if you wanted it to look smocked)
-sewed up the side to make a tube
-cut two thick strips of fabric for the shoulder straps and tapered them in at the edges
-hemmed them
-sewed an elastic strip under what would be the inside edge of each strap to make them ruffle
-sewed the straps on
...and that was it! Still...I thought it needed a little something extra. So I whipped up a few crocheted flowers and attatched them with a needle and thread, and voila!


(My sweet baby boy was quite the generous little model.) (And that's my mom-say hi mom!)
Sorry I never remember to take pictures during the sewing process, partially because it's always a spur of the moment activity and partially because I make things up as I go along. But that's what I like about sewing! You can just do what feels good and have fun playing around!
And that's what I encourage y'all to do! Do some freestyle creating! And if you come up with something you want to share, go ahead and link me to it!
Have fun makin' stuff :)
P.S. this project probably cost me less than $0.50 to make. Say what?!
6.29.2010
My Dry Erase Board is Better Than Yours :)
So, I recently got a new job in order to help out with our finances and it's kept me pretty busy. (Hence the time between this post and my last.) The new job consists of going on lots of appointments, and there have been a few times when I've made the mistake of scheduling them when the hubby is supposed to be at work and no one's home to watch the babies, so I thought it might be a good idea for us to have a big dry erase board on which to lay out our schedules for the following week!
I remembered seeing this post a few months ago and I thought it was a really easy, cute idea so I tweaked it a bit to fit my personality/kitchen decor a little better. :)
Supplies needed:
cute fabric
old nasty frame
tape
I already had the tape and the frame, so I went to Hobby Lobby to find some fabric. I debated whether or not to get fabric with a pattern on it since I was worried about being able to read whatever was written over it but in the end I couldn't settle for the plain solid kind. I wanted it to be more fun than that!

I brought the nasty frame up from the basement, dismantled it, and got to sanding.

As you can see, much distressing had already happened naturally :)

I couldn't find my regular style sand paper, so I used one of the replacement papers from the hubby's power sander (I have yet to break that bad boy in!)

My original plan was to sand and then paint the frame, but once I wiped off all the dust I kida liked it as it was so I decided to leave it.
I put the glass back into the frame, wrapped the fabric around the cardboard frame insert and just taped it to the back because I'm ghetto like that.

And voila!


All in all, this project cost me $4.50 to make. (Money spent on the fabric.) While I was at Hobby Lobby, I checked out their plain dry erase boards and the cheapest one (same size as the one I made) was $8.00. So mine was way cuter and half the price! I love DIY!
And despite how it may look in the picture, it's actually really easy to read what's written on it, so I don't regret going for the printed fabric at all. I love it!! I keep going into the kitchen just to look at it. No, really!
I think this project would look nice with plain white linen or burlap, too. The next time I make one of these, I want to get some of that glass etching solution so I can etch the days of the week onto the back of the glass. Classy!
6.14.2010
Uncharted Territory
Hey guys! I had a bunch of things I wanted to blog about today (I found another reason to love baking soda and vinegar!!) But that will have to wait since time completely got away from me today. Instead, I leave you with this post from a while back! It's been on my mind lately because, although the weather in Utah would have us believe otherwise, Spring is on it's way and it's the PERFECT time for one of my favorite hobbies: making homemade fabric dye!


I can't even tell you how much fun I had with this. I got to pick flowers and experiment in the kitchen and create beautiful fabric for my sewing pleasure all at once! I can't wait till my kids are old enough to help out with this stuff because I think they'll get a kick out of it. It certainly appealed to the kid in me!
I started out by doing a little research online. Just googling "homemade fabric dye" brought up plenty of cool links. I found out that you can use pretty much anything to dye fabric (flowers, grass, bark, roots, fruit, veggies, spices, etc.)
All you need is:
a big pot
water
whatever you're using for color (in this case, dandelions, mango skins, turmeric and strawberries)
salt
a strainer
First, I went out to our backyard and harvested a small portion of our flourishing dandilion population.

I was worried that the dandilions wouldn't produce a dark enough color, so I cut up a mango and threw in the skins. (After eating what was inside, of course.)

Next, I added about a tablespoon of turmeric.

I threw it all in a pot and covered it with water, brought it to a boil, and let it simmer for about 30 mins. (It should be noted that if you plan on trying this with other plants, you should use a pot that you don't plan to cook with again as some plants are poisonous.)

Next, I strained out the boiled flower bits and all that other good stuff.

After which, I was left with this!

Meanwhile, I prepared the fabric by boiling it for an hour in a salt water solution (1/4 cup salt for ever 4 cups of water) because apparently that helps it to hold the color better. The salt solution is for fruit dyes, there's a vinegar solution for flower dyes (4 parts cold water to 1 part vinegar). Then, I rung it out and poured on the Turdango dye! (Get it? Turdango? Bahaha....)

Now, the fabric always dries a little lighter than what you see in the pot. So, this light yellow tint worried me. I whipped up another dye concoction of straight turmeric (4 tablespoons) and water, and gave the sheet abother bath. (Results at the end of the post.)
Next up, I figured I'd use the strawberries at the bottom of the strawberry carton in my fridge. You know, the ones that go mushy and grow mold but you never notice it in the store, no matter how hard you look? I wasn't planning on eating them. Waste not, want not!

...threw in a few splashes of balsamic vinegar.

And a little kool-aid, for good measure. (Why not?)

Boiled it, let it simmer for 30 mins while i prepared the fabric in another salt bath, and after wringing out the fabric, I poured on the dye! (Vinaberry-Aid? Meh?)


And here's what I ended up with!

I liked that turmeric dye so much, I saved what was left and put it in the fridge (labeled, so the hubby doesn't try to drink it). It should keep for a couple of weeks, while I look for something else to turn yellow :)

I whole-heartedly encourage you guys to try this out at home. It's so much fun!! So fun!
Subscribe to:
Posts (Atom)


